
This post is for students (or parents of students) trying to create some normalcy during these strange, suddenly quarantined times we find ourselves in. COVID-19 has robbed us of countless gatherings and experiences, but it can’t rob us of our spirit. The digital age we live in has allowed us to stay in touch, stay entertained, and simulate some of the experiences we are missing. Let’s apply that to one of my fondest high school memories – yearbook signing (using Jamboard).
Yearbook signing is an idea that has been around since the late 17th century. It is an annual event that everyone looks forward to. It is always so much fun to read the inside jokes, recall the memories, relive the sporting events, and seal the friendships in ink.
In this post, I’m going to introduce a free software that can be used for digital yearbook signing. It is a Google product that most of us already have access to. I’ll go over how to set up your digital yearbook page, how to share it with your friends, and how to print it so that you can insert it into your physical yearbook.
What Is Jamboard
Jamboard is a free digital whiteboard created by Google. It can be used on your computer, tablet, or cell phone. You can write on a Jamboard with a mouse or touch screen. Images and sticky notes can also be inserted. A Jamboard can be used by just one person, or shared, allowing multiple people to write on it at the same time. Here is a quick video I made about how teachers can use Jamboard as a makeshift touch screen for recording lectures. (Using Jamboard to Write Without A Touchscreen).
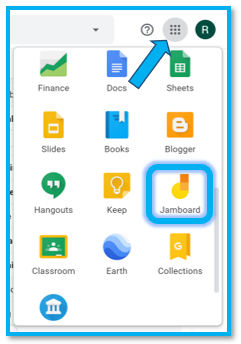
If you have a gmail account (or a school email address that uses gmail), then you are already signed up for Jamboard. You can access it by going to jamboard.google.com, or by clicking on the Google app menu from your Google account. When you are logged in to any Google product (Gmail, Drive, Hangouts, Sheets, Calendar, etc), click on the dots at the top right and scroll down to find Jamboard.
Once you are logged into Jamboard, click the plus sign at the bottom right to create a new board. You can give your new board a title. For yearbook pages, I recommend something with your name in it so that your friends know whose pages they are signing.

The menu on the left allows you to choose pen colors, erase, insert images, and insert sticky notes into the Jamboard. These options are great because they allow your friends with or without a touchscreen to sign your digital yearbook pages. Your friends with a touchscreen can write directly on the Jamboard. Your friends without a touchscreen can write on paper and insert a picture of what they have written. (I talk a little more about this further down and how you can make an image of writing blend better into the Jamboard).
Sharing Your Jamboard With Your Friends
Once you have created your digital yearbook pages on Jamboard, click the share button at the top right. You have several options as to how you can share this with your friends.
You can either share the Jamboard with specific people using their email addresses, or you can set up link sharing. Link sharing will give access to anyone who has the link. You’ll want to be mindful of who you share the link with. Sharing it on social media would be the equivalent of leaving your yearbook in the school cafeteria unattended and hoping for the best.
The Jamboard will default to give only you access. To set up link sharing, click “change” beside Private.

From the next screen, you need to turn link sharing On AND change the access setting to “Can edit.” Otherwise your friends will be able to see your Jamboard, but not sign it. Click save to go back to the original share page. This page will display the link you need to share with your friends.
Signing the Digital Yearbook
Once your friends access the link, they can sign your digital yearbook. The age old problem of running out of space is no longer an issue. The “>” arrow at the top creates more frames that can be written on.
Friends with a touch screen can write directly on the Jamboard. Hovering over the pen gives a few more color/marker options to spice things up.
Friends without a touchscreen can write on paper and insert a picture of their writing.

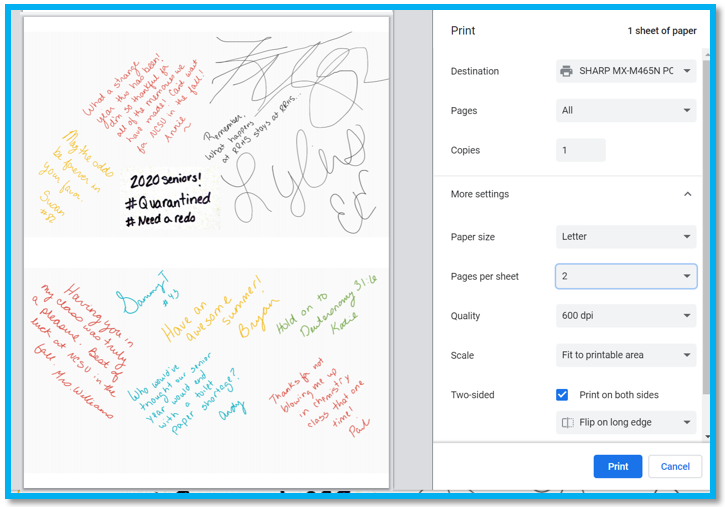
The picture above is a digital yearbook Jamboard that some friends and I created. Several of us were logged in and writing at the same time. One friend used her mouse to write, while others had touchscreens and digital pens.
The “2020 Seniors” portion with the hashtags was written on paper with a Sharpie. I used my laptop’s camera to snap a photo of it and inserted it into the Jamboard. (Insert pictures with the options on the left).
Most computers have a “document” or “whiteboard” option when either taking or viewing a photo. I used this to make the image blend more into the Jamboard. After taking the photo with my laptop, while viewing the photo, I selected the “whiteboard” option. This caused the background to change to a shiny white. This will look a little different depending on what computer or software you are using. If you are using a cell phone, the CamScanner app does a great job of erasing backgrounds for documents.
I love Jamboard for this purpose, because there are so many options as to how your friends can interact with your yearbook pages!
Printing Your Digital Yearbook Pages
Remember how you used to buy extra signing pages and insert them into your yearbook? Print these digital pages and insert them the same way.
Start by downloading your Jamboard as a PDF. Click the three dots at the top of the page and select the “Download as PDF” option.

Once it downloads, I recommend opening it in something like Adobe Acrobat Reader. This will offer you more printing options.
While you can certainly print on any paper, if you want it to blend with your yearbook, consider glossy paper. Most of us have inkjet printers at home. Here are some glossy paper options for inkjet printing: Amazon Glossy Inkjet Options.
Printing two of the Jamboard frames to a page will give the best appearance for a digital yearbook. In Adobe, this option is under “More Settings.” Set the pages per sheet option to 2 and you will end up with a full sized yearbook page ready for printing.
Some Things to Consider…
I really only recommend sharing the link for your Jamboard page with people you trust. Especially if you are a parent setting this up for a younger student, you can control this by sharing to specific people through email rather than sharing a link.
Sometimes yearbook posts are a little more private in nature. You can either set up a separate Jamboard for these cases, or you can have these people sign your digital Jamboard last. Turn off the link sharing option at any time to reduce access to the pages.
A few cons to this method:
- It would be easy for one person to erase another person’s message (either maliciously or accidentally). You may want to occasionally save the pages as a PDF to prevent losing special thoughts from your friends.
- If you use link sharing, you may get messages from unintended people.
- There is no way to tell who wrote what. Unlike some Google products, Jamboard does not display revision history.
- No one can sign your crack (though this may be a pro rather than a con).
What do you think?
Is Jamboard something that would work well for you or the students in your life? I’d love to hear from you in the comments or one of my social media channels.
If you found this post helpful, how about using one of those fancy buttons on the right and give it a share. Many thanks! 😉

Leave a Reply